angular2入门教程之动态数据创建Checkbox
在web开发前端开发中,我们处理最多的可能就是数据交互表单操作. 有候我们有可能是通过后端的数据来构造表单.
今天这个教程就是通过动态的数组来生成表单checkbox控件, 在学习之前你需要熟悉angular, typescript这此内容,
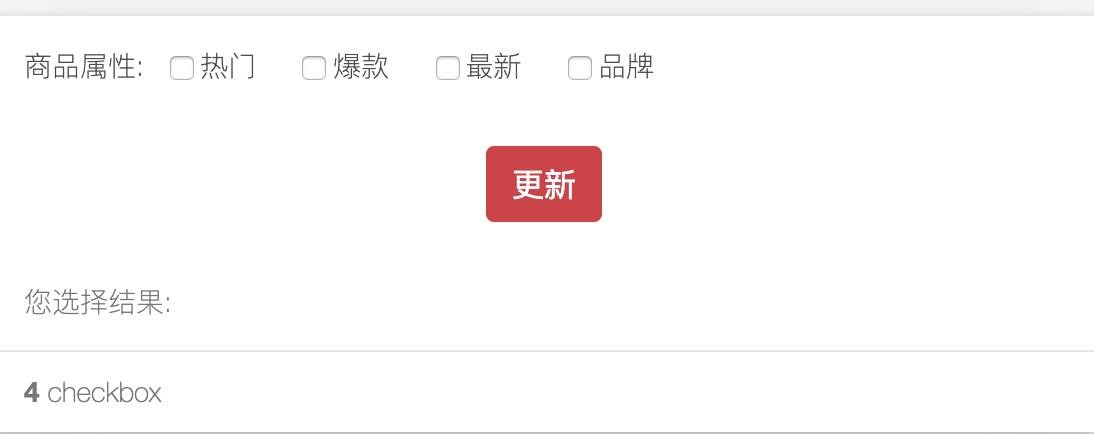
你也可以看上一篇文章来入门学习,下面就是我们实现之后的效果:
准备开始
开始之前,我们需要把项目建好上次文章已经说过通过angular cli来创建项目。这次我们还是用这个来创建. 这次我们的html结构和样式部分可以共用上次的一部分。
meshell@root$ ng new angular-dynamic-checkbox代码实现
假定我们需要实现的是更新商品标签属性,商品标签可以有很多组合,选择的组合值累加和发给服务端处理。标签属性可能来自服务端而不是本地. 比如下方的商品标签值:
const labels = [
  { value: 1, name: '热门' },
  { value: 2, name: '爆款' },
  { value: 4, name: '最新' }
];
在学习动态创建checkbox之前,我们需要学习下Reactive Forms, 也就是说angular提供一个这样的组件给我们使用. Reactive Forms主要由三种Class类型组成。第一个FormGroups,通常代表一个表单。 FormGroup通常由许多FormControls组成。 FormControl通常表示表单中的单个输入。最后是FormArray。 FormArray用于表示相互关联的FormControl集合。对于我们的示例,我们将使用所有这些类。具体来说,FormArray提供了一种创建复选框控件列表的简便方法。
首先,我们将开始在组件的app.component.ts和模板中创建FormGroup, 还需要将FormsModule、ReactiveFormsModule导入到app.module.ts
import { Component } from '@angular/core';
import {Title} from '@angular/platform-browser';
import {FormBuilder, FormGroup} from '@angular/forms';

@Component({
  selector: 'app-root',
  templateUrl: './app.component.html',
  styleUrls: ['./app.component.scss']
})
export class AppComponent {

  title = 'angular-dynamic-checkbox';

  count = 0;

  form: FormGroup;

  labels = [];

  constructor(public titleService: Title, public formBuilder: FormBuilder) {
    this.form = this.formBuilder.group({
      'labels': []
    });
  }

  submit($event) {
    console.log($event);
  }
}
我们通过formBuilder组件创建一个formGroup给模板调用, 这时候我们的模板就可以使用了.
...
<form [formGroup]="form" (submit)="submit($event)">
    <button class="btn btn-danger" type="submit"></button>
</form>
...
现在我们只是通过[formGroup]="form"把表单和formGroup绑定了,(submit)="submit($event)"来接收值。标签还没有绑定。这时候我们需要用到formArray类来添加formControl。
  ...
  labels = [
    {'value': 1, 'name': '热门'},
    {'value': 2, 'name': '爆款'},
    {'value': 4, 'name': '最新'},
  ];

  constructor(public titleService: Title, public formBuilder: FormBuilder) {
    this.form = this.formBuilder.group({
      'labels': new FormArray([])
    });
    this.labels.map( (value, index) => {
      (this.form.controls.labels as FormArray).push(new FormControl());
    });
  }
...我们遍历labels并创建一个新的FormControl实例。通过我们创建的每个控件,我们将新控件推送到我们的FormArray上。表单数组将每个复选框视为控件集合的一部分。 FormArray≥创建了一个易于使用的API来设置值并检查整个集合的验证,而不必遍历每个FormControl。接下来,我们需要将订单FormArray连接到模板。
  ...
  <form [formGroup]="form" (submit)="submit($event)">
    <div class="form-group-inline">
      <label>商品属性: </label>
      <div class="control-group-inline">
        <div formArrayName="labels" *ngFor="let label of form.controls.labels['controls']; let i = index;" class="checkbox-group">
            <input type="checkbox" id="label{{ i }}" [formControlName]="i"/>
            <label for="label{{ i }}">{{ labels[i].name }}</label>
        </div>
      </div>
    </div>
    <div class="form-group text-center">
        <button class="btn btn-danger" type="submit">更新</button>
    </div>
  </form>
...在模板中,我们定义了一个用*ngFor指令迭代的复选框。在标签上,我们还定义了formArrayName =“labels”来告诉表单API哪些控件属于FormArray。在每个复选框上,我们给它一个控件名称,在这个例子中它只是循环的索引。现在,当Angular实例化此表单时,每个复选框都连接到我们的表单,我们在TypeScript代码中声明。如果一切都正常你应该看到这样的:
接下来,我们需要在submit中操作选中的复选框,将结果赋给另一个变量之后绑定到模板中显示选择的值。
  ...
  selected: string[];

  submit($event) {
    this.selected = [];
    this.form.value.labels.map((value, index) => {
      if (value) {
        this.selected.push(this.labels[index].name);
      }
    });
  }
...this.form.value就是整formGroup,我们通过labels组迭代拿到对应的复选框状态。选中的我们将push到选中的变量中. 在通过*ngFor指令迭代的选中的值到模板中.
<div class="content">
您选择结果: <span *ngFor="let item of selected;">{{ item }} </span>
</div>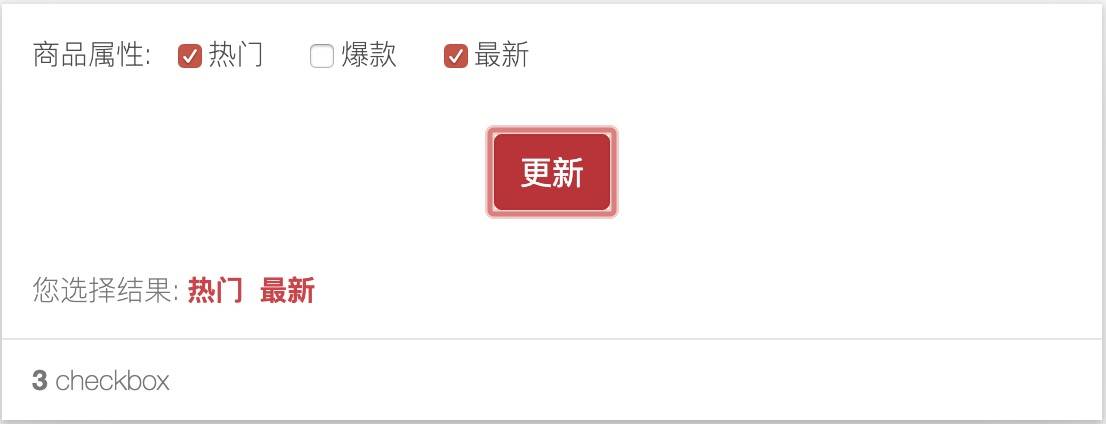
异步数据
在上面我们实际已完成了动态创建checkbox, 只是数据是同步状态。我们现在通过请求服务端返回数据创建动态复选框. 我们创建了一个mock数据. 然后通过http组件去请求配置的labels.
  ...
  constructor(public titleService: Title, public formBuilder: FormBuilder, public http:  HttpClient) {
    this.form = this.formBuilder.group({
      'labels': new FormArray([])
    });
    this.getLabels().subscribe(response => {
      this.labels = response.labels;
      this.labels.map( (value, index) => {
          (this.form.controls.labels as FormArray).push(new FormControl());
      });
      this.count = this.labels.length;
    });
  }
  getLabels() {
    return this.http.get('http://www.mocky.io/v2/5c95da8a3600006300941fcd');
  }
...我们增加了一个getLabels函数返回的是Observable,这个是rxjs的对象我们今天就不讲这个。我们只需要订阅它的结果,像上面的this.getLabels().subscribe。在使用httpClient我们需要在app.module.ts中导入HttpClientModule模块.