
angular2入门教程之todolist实现
Angular2已经出来好久了现在版本都已经是7了,相比AngularJS的MVC式架构、Angular2的组件式架构更加出色。当然在新版中也保留了很多老版的特性。
我们今天这篇教程装教大家使用Angular2开发经典应用ToDoList. 在学习之前你需要有以下的学习基础.
- 熟悉
JavaScript语言. - 熟悉TypeScript语言, 在
Angular2中开发全部是以ts语言作为开发也就是TypeScript. - Sass语法(
Sass是一个CSS预处理语言) - 最好有过
AngularJS的开发经验. 当然这也不是必须的.

在开始之前,请确保你已经装好node、npm或yarn等工具.
开始
-
安装
angular/cli工具npm install -g @angular/cli` -
创建应用
使用
ng new [应用名称]命令来创建一个应用比如我这里应用名称是angular-demo-todong new angular-demo-todo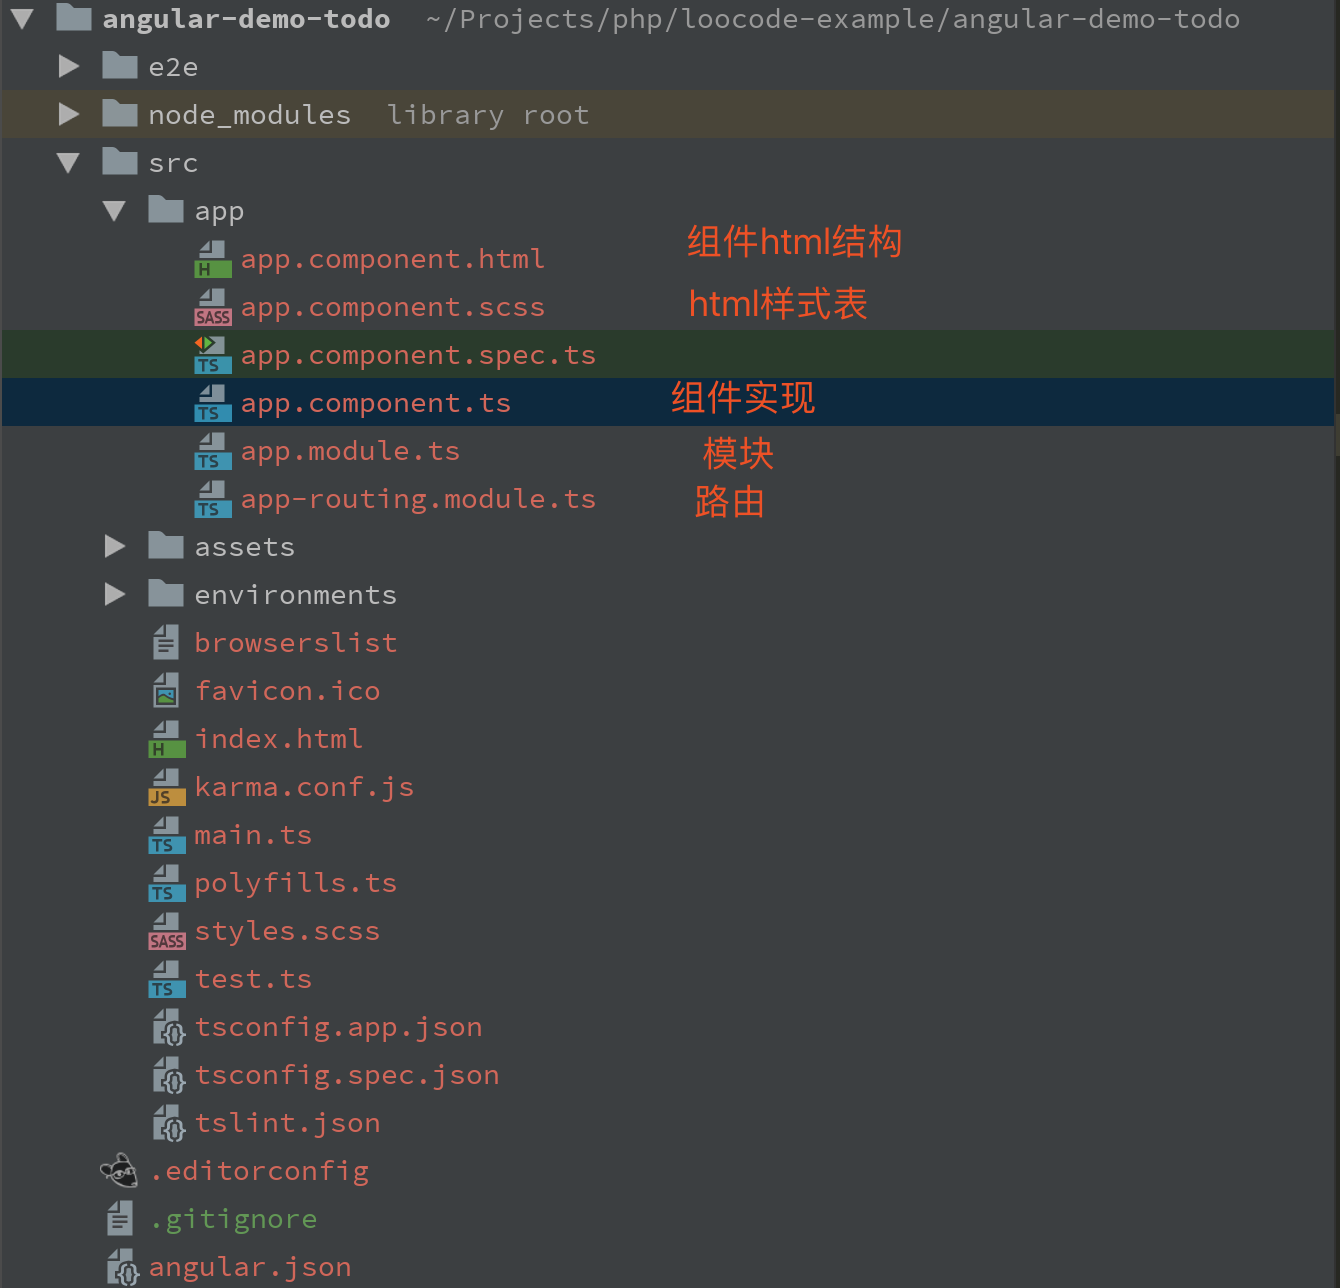
-
启动应用
创建应用之后,我们可以直接使用
ng start来启动应用。然后使用浏览器打开http://localhost:4200/就能看效果。
可以直接修改文件来看效果默认就已经热替换了无需做任何配置.
TODO实现
在编写自己的代码之前,我先把官方生成的代码清除掉。我们需要为todolist实现以下几个功能.
- 模板文件实现(html内容)
- todo展示、添加、删除
- 数据存储(刷新后不会丢失)
此教程中我们只需要更改app.component.html、app.component.html、app.component.ts、app.modules.ts这几个文件.
html结构
我们以header, content, footer作为html结构. 我这里就只列出完整结构不作标签的描述了.
<section class="todo">
  <header>
    <h1>Todo</h1>
    <input autofocus type="text" name="todo" class="todo-input" placeholder="尝试输入些文字">
  </header> <!-- header 部分 -->
  <section class="todo-main">
    <ul class="todo-list">
      <li>
        <div>
          <label>一条todo</label>
          <button></button> <!-- 删除按钮 -->
        </div>
      </li>
    </ul>
  </section> <!-- content 部分 -->
  <footer class="footer">
    <span class="todo-count">
      <strong>1</strong> 个元素
    </span>
  </footer> <!-- footer 部分 -->
</section>
html样式
样式我们便用的是scss文件格式. 这里我讲下里面的 ::ng-deep(文档)用法. 因为现在的angular是按组件形式来表达的。
默认组件的样式是设置当前组件内的标签样式。如果你想设置外层..(或外层组件)..的样式必须使用::ng-deep来指定是
::ng-deep body {
  font: 14px 'Helvetica Neue', Helvetica, Arial, sans-serif;
  line-height: 1.4em;
  background: #f5f5f5;
  color: #4d4d4d;
  min-width: 230px;
  max-width: 550px;
  margin: 0 auto;
  font-weight: 300;
}
button {
  margin: 0;
  padding: 0;
  border: 0;
  background: none;
  font-size: 100%;
  vertical-align: baseline;
  font-family: inherit;
  font-weight: inherit;
  color: inherit;
  -webkit-appearance: none;
  -webkit-font-smoothing: antialiased;
}

.todo {
  background: #fff;
  margin: 130px 0 40px 0;
  position: relative;
  box-shadow: 0 2px 4px 0 rgba(0, 0, 0, 0.2), 0 25px 50px 0 rgba(0, 0, 0, 0.1);
}

.todo header h1 {
  font-size: 100px;
  font-weight: 100;
  text-align: center;
  color: rgba(175, 47, 47, 0.15);
  position: absolute;
  top: -155px;
  width: 100%;
}

.todo-input {
  position: relative;
  margin: 0;
  width: 100%;
  font-size: 24px;
  font-family: inherit;
  font-weight: inherit;
  line-height: 1.4em;
  color: inherit;
  box-sizing: border-box;
  padding: 16px 16px 16px 60px;
}

.todo-main {
  position: relative;
  z-index: 2;
  border-top: 1px solid #e6e6e6;
}

.todo-list {
  margin: 0;
  padding: 0;
  list-style: none;
}

.todo-list li:last-child {
  border-bottom: none;
}

.todo-list li {
  position: relative;
  font-size: 24px;
  border-bottom: 1px solid #ededed;
}

.todo-list li label {
  word-break: break-all;
  padding: 15px 15px 15px 60px;
  display: block;
  line-height: 1.2;
  transition: color 0.4s;
}

.todo-list li button {
  display: none;
  position: absolute;
  top: 0;
  right: 10px;
  bottom: 0;
  width: 40px;
  height: 40px;
  margin: auto 0;
  font-size: 30px;
  color: #cc9a9a;
  margin-bottom: 11px;
  transition: color 0.2s ease-out;
}

.todo-list li button:hover {
  color: #af5b5e;
}

.todo-list li button:after {
  content: '×';
}

.todo-list li:hover button {
  display: block;
}


.footer {
  color: #777;
  padding: 10px 15px;
  height: 20px;
  text-align: center;
  border-top: 1px solid #e6e6e6;
}

.footer span {
  float: left;
}
代码实现
-
input绑定
更改
<input>标签,将使用[(ngModel)]绑定变量, 接收keyup事件. 在绑定之前你必须更改app.module.ts文件为组件FormsModule模块.// app.module.ts @NgModule({ declarations: [ AppComponent ], imports: [ ... FormsModule, ... ], providers: [], bootstrap: [AppComponent] })<!-- app.component.html --> <input autofocus type="text" name="todo" class="todo-input" [(ngModel)]="todo" (keyup)="enter($event)" placeholder="尝试输入些文字">// app.component.ts ... @Component({ selector: 'app-root', templateUrl: './app.component.html', styleUrls: ['./app.component.scss'] }) export class AppComponent { title = 'angular-demo-todo'; @Input() todo: string; // 绑定到input的([ngModel])="todo" ... } -
实现添加展示
在input绑定介段我们已经绑定了
keyup事件, 我们只需要实现enter方法.// app.component.ts export class AppComponent { ... @Input() todo: string; list = []; // 存储todo的数组. count = 0; // 保存todolist数量. enter($event: KeyboardEvent) { if ($event.key === 'Enter' || $event.which === 13) { // 如果按下的是回车,我们就将todo添加到list中去. this.list.push(this.todo); this.count++; // 统计数量 this.todo = ''; // 将当前的todo置为空. 等待输入下一个 return; } console.log($event); } }使用
*ngFor语法循环list变量. 为todo绑定delete事件。
使用*ngIf来控制标签的显隐.<!-- app.component.html --> ... <li *ngFor="let item of list; let i = index;"> <div> <label>{{ item }}</label> <button (click)="delete(i)"></button> </div> </li> <footer *ngIf="count" class="footer"> <span class="todo-count"><strong>{{ count }}</strong> 个元素</span> </footer> -
实现删除
我们只需要实现
delete方法, 他接受一个索引参数.... delete(i: number) { this.list.splice(i, 1); // 移除todo this.count--; // 更新数量 }
到此为止我们已经实现了一个简单的todolist. 下面我们用localStorage来实现本地存储.
存储实现
实现我们添加一个依赖库angular-webstorage-service.
# package.json
{
    ...
    "dependencies": {
        "angular-webstorage-service": "^1.0.2"
    }
}
我们需要再次更改app.module.ts文件将此模块导入.
// app.module.ts
@NgModule({
  declarations: [
    AppComponent
  ],
  imports: [
    ...
    FormsModule,
    StorageServiceModule
    ...
  ],
  providers: [],
  bootstrap: [AppComponent]
})
更改组件的构造函数将WebStorageService, Title服务注入(Angular注入是通过构造函数注入).
// app.component.ts
import {Title} from "@angular/platform-browser";
import {LOCAL_STORAGE, WebStorageService} from "angular-webstorage-service";
export class AppComponent {
  title = 'angular-demo-todo';
  KEY = 'todo';
  ...
  constructor(@Inject(LOCAL_STORAGE) public webStorage: WebStorageService, public titleService: Title) {
    this.titleService.setTitle(this.title);
    let storage = this.webStorage.get(this.KEY); // 读取本地存储的todo
    if (storage !== null) {
      this.list = storage;
      this.count = storage.length;
    }
  }
  ...
}
更改相应的添加和删除.
// app.component.ts

enter($event: KeyboardEvent) {
  ...
  this.webStorage.set(this.KEY, this.list);
  ...
}
delete(i: number) {
  ...
  this.webStorage.set(this.KEY, this.list);
  ...
}
到此为止整个todolist的代码已全部完成。最后我们执行命令生成线上版本
ng build --prod