Symfony Security Github登录授权实践
在上一篇文章中介绍了小程序手机号登录的验证器方式。这篇文章中将实现了一个三方Oauth2登录的验证器,主要使用github的登录。
在准备在接入OAuth2登录时,我们需要去对应的服务平台申请应用来获取APP_ID和APP_SECRET等信息,以及需要配置回调地址。
GITHUB
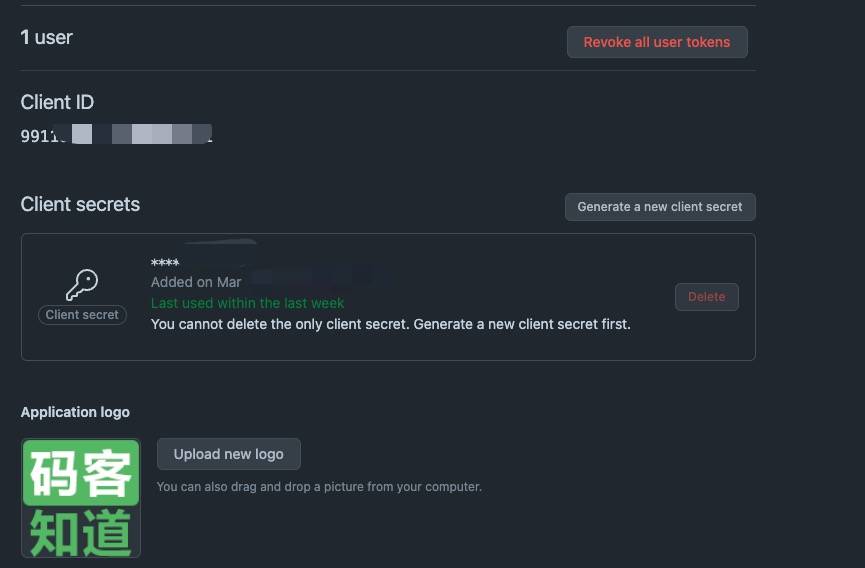
进入Github创建应用,填写完信息后,您将获得需要的基础信息就像这样:

本地调试你只需要把回调地址换成你本地的地址,如: http://localhost:8080/github/callback
OAuth扩展包
OAuth2验证方式是一套标准的流程,PHP社区提供了开箱即用的Composer扩展包,当前比较流行的是league/oauth2-client扩展包。
在你的composer.json文件中加入它们:
{
	"require": {
		"league/oauth2-github": "*",
		"league/oauth2-client": "*"
	}
}
不要忘记运行
composer install来安装它们!
验证器入口
可能你的系统又有表单登录,又有三方登录。需要将三方登录的链接渲染到页面中。
use League\OAuth2\Client\Provider\Github;
use Symfony\Bundle\FrameworkBundle\Controller\AbstractController;
use Symfony\Component\Routing\Generator\UrlGeneratorInterface;
use Symfony\Component\HttpFoundation\Response;

#[AsController]
class ConnectController extends AbstractController
{
	#[Route('/connect/github', method: ['GET'])]
	public function github(): Response
	{
		$github = new Github([
			'clientId' => 'xxxx', // 申请到的APP_ID
			'clientSecret' => 'xxxxx', // 申请到的APP_SECRET
			'proxy' => '', // 可能你需要科学上网,请配置此处
		]);
		$options = [
			'scope' => ["user:email"],
			'redirect_uri' => $this->generate('oauth2_connect_callback',[],UrlGeneratorInterface::ABSOLUTE_URL)
		];
		$url = $github->getAuthorizationUrl($options);
		return $this->redirect($url);
	}
	#[Route('/connect/github/callback', name: 'oauth2_connect_callback')]
	public function callback(string $provider)
	{
		 // 这里不写任何逻辑,逻辑只写在自定义的验证器里面
	}
}
验证器类
如果你使用了MakeBundle, 你可以使用以下命令来快速创建。
$ bin/console  make:security:custom

 What is the class name of the authenticator (e.g. CustomAuthenticator):
 > GithubAuthenticator

 updated: config/packages/security.yaml
 created: src/Security/GithubAuthenticator.php


  Success!
// src/Security/GithubAuthenticator.php
<?php

namespace App\Security;

use Symfony\Component\HttpFoundation\JsonResponse;
use Symfony\Component\HttpFoundation\Request;
use Symfony\Component\HttpFoundation\Response;
use Symfony\Component\Security\Core\Authentication\Token\TokenInterface;
use Symfony\Component\Security\Core\Exception\AuthenticationException;
use Symfony\Component\Security\Core\Exception\CustomUserMessageAuthenticationException;
use Symfony\Component\Security\Http\Authenticator\AbstractAuthenticator;
use Symfony\Component\Security\Http\Authenticator\Passport\Badge\UserBadge;
use Symfony\Component\Security\Http\Authenticator\Passport\Passport;
use Symfony\Component\Security\Http\Authenticator\Passport\SelfValidatingPassport;

class GithubAuthenticator extends AbstractAuthenticator
{
    public function supports(Request $request): ?bool
    {
        // 检测怎样的请求才走该验证器
        // return $request->headers->has('X-AUTH-TOKEN');
    }

    public function authenticate(Request $request): Passport
    {
        // 该方法是验证的主要方法.
        // $apiToken = $request->headers->get('X-AUTH-TOKEN');
        // if (null === $apiToken) {
        // The token header was empty, authentication fails with HTTP Status
        // Code 401 "Unauthorized"
        // throw new CustomUserMessageAuthenticationException('No API token provided');
        // }

        // implement your own logic to get the user identifier from `$apiToken`
        // e.g. by looking up a user in the database using its API key
        // $userIdentifier = /** ... */;

        // return new SelfValidatingPassport(new UserBadge($userIdentifier));
    }

    public function onAuthenticationSuccess(Request $request, TokenInterface $token, string $firewallName): ?Response
    {
        // on success, let the request continue
        return null;
    }

    public function onAuthenticationFailure(Request $request, AuthenticationException $exception): ?Response
    {
        $data = [
            // you may want to customize or obfuscate the message first
            'message' => strtr($exception->getMessageKey(), $exception->getMessageData()),
            // or to translate this message
            // $this->translator->trans($exception->getMessageKey(), $exception->getMessageData())
        ];

        return new JsonResponse($data, Response::HTTP_UNAUTHORIZED);
    }

    // public function start(Request $request, AuthenticationException $authException = null): Response
    // {
    //     /**
    //      * If you would like this class to control what happens when an anonymous user accesses a
    //      * protected page (e.g. redirect to /login), uncomment this method and make this class
    //      * implement Symfony\Component\Security\Http\EntryPoint\AuthenticationEntryPointInterface.
    //      *
    //      * For more details, see https://symfony.com/doc/current/security/experimental_authenticators.html#configuring-the-authentication-entry-point
    //      */
    // }
}
将security.yaml转化成security.php文件。
# config/packages/security.php
use App\Entity\User;
use App\Security\AccessDeniedHandler;
use App\Security\AuthenticationEntryPoint;
use App\Security\GithubAuthenticator;
use Symfony\Component\DependencyInjection\ContainerBuilder;
use Symfony\Component\Security\Core\Authorization\Voter\AuthenticatedVoter;
use Symfony\Component\Security\Core\User\PasswordAuthenticatedUserInterface;
use Symfony\Component\Security\Http\Authenticator\JsonLoginAuthenticator;
use Symfony\Config\SecurityConfig;

return static function (SecurityConfig $config, ContainerBuilder $builder) {

    $firewallConfig = $config->firewall('main');
    $firewallConfig
        ->pattern('.*')
        ->lazy(true)
        ->customAuthenticators([
            GithubAuthenticator::class,
        ])
    ;
};
用户提供商
三方登录之前,我们需要配置好用户提供商,需要为三方登录用户建立用户表。还是使用命令来生成实体类:
$ php bin/console  make:user

 The name of the security user class (e.g. User) [User]:
 > GithubUser

 Do you want to store user data in the database (via Doctrine)? (yes/no) [yes]:
 > yes

 Enter a property name that will be the unique "display" name for the user (e.g. email, username, uuid) [email]:
 > email

 Will this app need to hash/check user passwords? Choose No if passwords are not needed or will be checked/hashed by some other system (e.g. a single sign-on server).

 Does this app need to hash/check user passwords? (yes/no) [yes]:
 > yes

 created: src/Entity/GithubUser.php
 created: src/Repository/GithubUserRepository.php
 updated: src/Entity/GithubUser.php
 updated: config/packages/security.yaml


  Success!


 Next Steps:
   - Review your new App\Entity\GithubUser class.
   - Use make:entity to add more fields to your GithubUser entity and then run make:migration.
   - Create a way to authenticate! See https://symfony.com/doc/current/security.html
这里我们的唯一标识字段名为email, Github OAuth登录能拿到email地址。
生成之后不要忘记使用bin/console make:migration && bin/console doctrine:migrations:migrate来构建实体表。
修改security.php文件,将用户提供商加入配置文件中。
// config/packages/security.php
// ...
return static function (SecurityConfig $config, ContainerBuilder $builder) {

    $config->provider('app_user_provider')
        ->entity()
        ->class(GithubUser::class)
        ->property('email')
    ;

    $firewallConfig = $config->firewall('main');
    $firewallConfig
        ->pattern('.*')
        ->lazy(true)
        ->provider('app_user_provider')
        ->customAuthenticators([
            GithubAuthenticator::class,
        ])
    ;
};
修改GithubAuthenticator.php文件,将上面生成的GithubUserRepository类注入到验证器类中。
class GithubAuthenticator extends AbstractAuthenticator
{
    private GithubUserRepository $repository;

    /**
     * 使用构造注入
     * @param GithubUserRepository $repository
     */
    public function __construct(GithubUserRepository $repository)
    {
        $this->repository = $repository;
    }
    // ...
}
验证器逻辑处理
一切准备就绪后,我们就要完成验证器中的验证逻辑。首先需要完成supports方法,之后是authenticate方法。
supports方法表示什么样请求才会经过此验证器处理。
    // ...
    public function supports(Request $request): bool
    {
        // 如果URL是`/connect/github/callback`就是github发出来的回调请求
        return $request->getPathInfo() === "/connect/github/callback";
    }
    // ...
authenticate方法只有supports为true才会执行, 它是登录验证的主方法。
现在authenticate方法的逻辑流程是检测code参数是否存在,根据code参数获取accessToken,再根据accessToken获取用户信息,根据用户信息中的email检测表中是否存在此邮箱用户(不存在就新增一条用户记录), 之后返回Passport类。
// src/Security/GithubAuthenticator.php
<?php

use League\OAuth2\Client\Provider\Github;
use League\OAuth2\Client\Provider\GithubResourceOwner;
use Symfony\Component\HttpFoundation\Request;
use Symfony\Component\HttpFoundation\Response;
use Symfony\Component\Routing\Generator\UrlGeneratorInterface;
use Symfony\Component\Routing\RouterInterface;
use Symfony\Component\Security\Core\Exception\AuthenticationException;
use Symfony\Component\Security\Http\Authenticator\AbstractAuthenticator;
use Symfony\Component\Security\Http\Authenticator\Passport\Passport;
use Symfony\Contracts\HttpClient\HttpClientInterface;
use App\Entity\GithubUser;
use App\Repository\GithubUserRepository;

class GithubAuthenticator extends AbstractAuthenticator
{

    private GithubUserRepository $repository;
    private HttpClientInterface $httpClient;
    private RouterInterface $router;

    /**
     * @param GithubUserRepository $repository
     * @param HttpClientInterface $httpClient
     * @param RouterInterface $router
     */
    public function __construct(GithubUserRepository $repository, HttpClientInterface $httpClient, RouterInterface $router)
    {
        $this->repository = $repository;
        $this->httpClient = $httpClient;
        $this->router = $router;
    }

    public function supports(Request $request): bool
    {
        // 如果URL是`/connect/github/callback`就是github发出来的回调请求.
        return $request->getPathInfo() === "/connect/github/callback";
    }

    /**
     * @param Request $request
     * @return Passport
     * @throws \Throwable
     */
    public function authenticate(Request $request): Passport
    {
        // TODO: Implement authenticate() method.
        $code = $request->get('code');
        if (empty($code)) {
            throw new AuthenticationException('授权参数解析失败...', Response::HTTP_NOT_ACCEPTABLE);
        }

        // 根据code先获取accessToken
        $github = new Github([
            'clientId' => 'xxxx', // 申请到的APP_ID
            'clientSecret' => 'xxxxx', // 申请到的APP_SECRET
            'proxy' => '', // 可能你需要科学上网,请配置此处
        ]);
        $options = [
            'scope' => ["user:email"],
            'redirect_uri' => $this->router->generate('oauth2_connect_callback', [], UrlGeneratorInterface::ABSOLUTE_URL),
            'code' => $code,
        ];
        $token = $github->getAccessToken('authorization_code', $options);
        /**
         * @var $resourceOwner GithubResourceOwner
         */
        $resourceOwner = $github->getResourceOwner($token);
        $email = $resourceOwner->getEmail();
        $user = $this->repository->findOneBy(['email' => $email]);
        if ($user == null) {
            $user = new GithubUser();
            $user->setEmail($email);
            $user->setRoles([]);
            // 请使用passwordHasher接口生成密码
            $this->repository->upgradePassword($user, 'xxxxxx');
        }
        return new SelfValidatingPassport(new UserBadge($user->getEmail(), function (string $email) use ($user) {
            return $user;
        }));
    }

    // ...
    public function onAuthenticationSuccess(Request $request, \Symfony\Component\Security\Core\Authentication\Token\TokenInterface $token, string $firewallName): ?Response
    {
        // TODO: Implement onAuthenticationSuccess() method.
    }

    public function onAuthenticationFailure(Request $request, AuthenticationException $exception): ?Response
    {
        // TODO: Implement onAuthenticationFailure() method.
    }
}
上面就是整个验证的逻辑代码,当然里面还有很多细节未处理。比如accessToken没有保存,没有关联到系统用户上等等。 以上代码不适合在生产环境中运行,可以用来在开发环境的验证逻辑使用。